
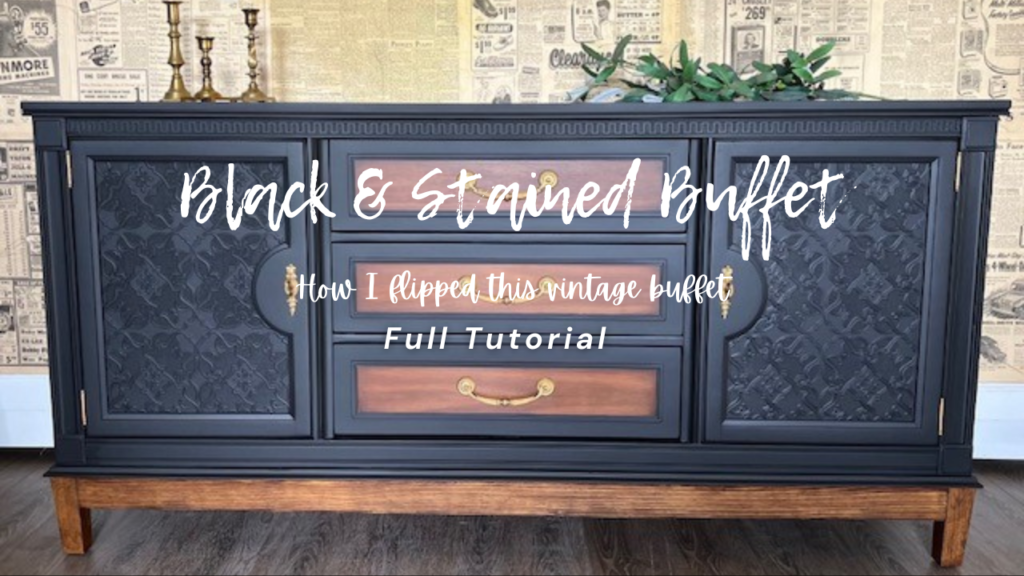
Black & Stained Buffet Makeover: Full Tutorial
Ready to start selling furniture for a profit?
I have been flipping furniture since 2019 & am finally ready to share some of the knowledge I have gained from my own successes & failures.
In this blog post, I will share step by step how to replicate this furniture flip with product links! I also walk you through how to apply wallpaper to furniture!
HAPPY FLIPPING!
Black & Stained Buffet Makeover: Full Tutorial
Furniture Backstory:
I purchased this piece from an estate sale last summer and it has been collecting dust for a year now. Life can get busy, and I tend to buy quicker than life allows me to flip! Also, if I am being completely honest- the process of acquiring the furniture that I like to flip is half of the fun for me.
The piece was overall in good condition other than a few dings here & there that I knew I could easily repair.
The Inspiration:
I am very into painted & stained combos, especially black & medium-dark stained combos. If a piece has a unique wood grain- I really like to highlight it with a semi-transparent stain, if possible.
I knew that I wanted to build a base for this piece to give it a more modern look
& I knew I was leaning toward a paint & stain combo. I try to keep my
plan general until I get all my prep work finished- the type & location of
repair work will determine which areas I could stain & which I could paint.
The official game plan for paint application is determined once these have been
identified & completed.
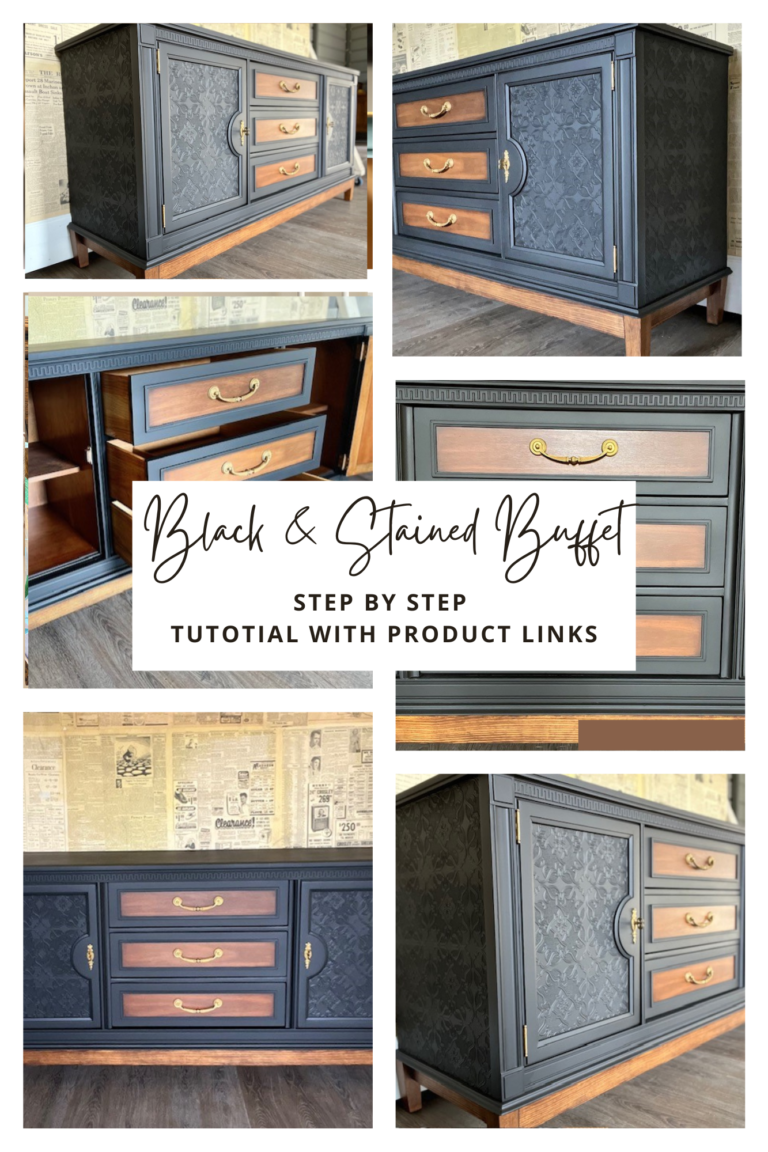
Supply List
Prep & Clean
- Orbital Sander
- Sanding pads
- Microfiber rags
- Cleaner: white lightening
- Painters tape
- Wood Filler
Paint & Stain Application
- Paint sprayer
- Primer: Bin 123
- Stain: Early American
- Paint color: Caviar
- Clear Coat: Flat out Flat
- Rub n buff
- Restore a finish
Wallpaper Application
Step 1
I started by removing the original base from the buffet- I knew I was going to build a new custom base for this piece.
Building a custom base or adding legs to a vintage or dated piece is one of the easiest ways to modernize your furniture. Building a base is fairly easy & with a little practice & the right tools- anyone can do it.
For this particular base build, I found some legs that I salvaged from an old side table that someone was trashing- I used to grab just about every piece of furniture I found on the side of the road but I was running out of storage. Now, when I find a really beat up, solid wood piece that is too damaged for me to waste my time on refinishing- I strip it for parts!
I must say that I do hold onto a bunch of random parts and my friends & family just loveeeee making fun of me for this- but this is the moment that I get to do my happy dance because IM FINALLY USING SOMETHING! Fucking- boom! I knew I could use those legs for something one day! Lol
I will not be going into detail on how I built this base, at this time. I promise to do a full post on how to build a base in a later post.
If you are going to be building bases on a frequent basis- I definitely recommend investing in a Kreg jig. I love my kreg jig pocket hole system and I use it all of the time.
Step 2
Next, I cleaned my piece with my favorite furniture cleaner- dixie belle paint company: white lightening. For this, I needed a bucket, water & a clean microfiber rag.
Once my piece is thoroughly cleaned inside & out- I start by marking all of the places I need to repair. Any dings, scratches, laminate lifting etc.
Step 3
I then use my wood filler to fill in the places I marked for repair.
Once my wood filler has completely dried & hardened- I can begin sanding.
Using my orbital sander, I sanded my repairs down to make the wood filler flush & then gave the entire body a good scuffing for better paint adhesion.
Once I am finished with repairs & sanding- I give the entire piece another detailed wipe down with my cleaner. I use my small shop leaf blower to blow out any lingering dust that settles before applying any paint.
Step 4
I then taped off the areas that I wanted to keep stained with my painters tape.
Then, it was time for primer. I used BIN 123 primer that I had tinted with just a dab of black paint. Using a high quality synthetic paint brush, I then applied the primer everywhere that was going to be painted.
I applied 2 coats of primer, allowing my first coat to dry completely before applying the second & lightly sanding between coats with a 220 grit sanding pad.
Step 5
Applying wallpaper
I was really going for a “high end” look for this piece and thought that adding this textured wallpaper would give it that elegance I was looking for.
I decided to add the wallpaper to the front portions of the doors & the sides.
Materials:
How to apply wallpaper:
Cut the wallpaper to size. Use a sharp pair of scissors or an exacto blade.
Using an inexpensive chip or sponge brush- apply an even layer of wallpaper adhesive directly to the area you want to apply the wallpaper.
Also, Apply a thin layer to the back side of the wallpaper (Especially on the edges)
Immediately, apply your wallpaper to the area to be covered.
Use a wallpaper smoothing tool to smooth out the wallpaper (start from the top left hand corner- apply some pressure & drag your smoothing tool across the wallpaper to smooth & work out any air bubbles.
Use a damp rag to clean up any wallpaper adhesive that may have gathered around your edges.
Allow wallpaper adhesive 24 hours for wallpaper adhesive to dry completely before painting.
Step 6
Paint Application
For this piece, I decided to use my paint sprayer. Using a paint sprayer is going to eliminate brush strokes and allow you to achieve a professional finish.
(Check out my post on “how to eliminate brush strokes” for additional tips to achieve a brush stroke free finish)
The paint color I chose for this piece: Dixie Belle Paint Company mineral paint in the shade “Caviar”
I applied 2 coats of paint- allowing my first coat to dry before applying my second & lightly sanding between each coat with a 220 sanding pad.
Step 7
Once my final coat of paint was completely dry- I used my paint sprayer to apply 2 coats of my protective finish.
The top coat I chose to use for this project- Flat out Flat made by General Finishes.
Step 8
Hardware Preparation
While my top coat was drying- It was time to prepare my hardware. The original hardware was in great condition apart from minor discoloration which was easily fixed with a little rub n buff.
Hardware “gold up” process:
Clean hardware using a Brillo pad & water. Scrub all present build up & dry completely.
Using a small eye shadow brush & rub n buff – apply small amounts of rub n buff in a swirl motion until hardware is covered to your liking.
I usually give my hardware about an hour to dry to the touch & then buff with a lint free rag before installing.
Step 9
Using a staining pad and a little Restore a Finish – I rubbed an even coat inside the cabinet, in the drawers, on the drawer sides and shelving to rejuvenate the original stain & hide any imperfections. You can apply this with a lint free rag or staining pad.
Last step: Happy dance!
I hope that you found this tutorial helpful & would love your feedback! If there is a particular topic, product, technique, etc. that you would find helpful, please leave a comment or send me an email!
As always, I am here to help! Welcome to the tribe!
- Reconciliation Furniture
dont miss out on any of the fun!- follow me:
